Instructions for Awesome Backgrounds for Powerpoint
We hope you make many a great presentation from these new powerpoint backgrounds.
The backgrounds have been designed to make life easier for you to make great looking
presentations. For example within each template there are already the most common types of
slide already made for you!
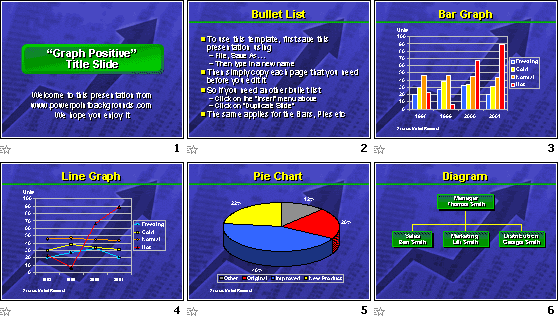
| - Title Slide |
- Bullet List |
- Bar Chart |
| - Line Graph |
- Pie Chart |
- Diagram |
| - A Blank Page |
- Matching Color Scheme |
You may wish to print out these instructions...
QUICK START GUIDE...
To Use An Awesome Background in Powerpoint
To use a template...
- Start powerpoint
- Choose the "File" menu, Click on "Open" (for PowerPoint 97/2000/2002/2003)

- Choose the "Office Button" (for PowerPoint 2007, 2010)
- Click on "Open"
- Navigate to where the powerpoint backgrounds are located
Examples:
C:\Users\YourUserName\Downloades if you downloaded a set
C:\Documents and Settings\YourUserName\My Documents if you saved the downloads someplace else
Note: If you are struggling to find where you have saved the downloaded files, you can search for them, all our files begin with the following 3 characters, AB- or awesome-. On a windows PC "Start > Search", then enter ab-*.* in the "all or part of the filename" search box to find 'local' files and folders.
The downloaded files that need extracting all begin awesome- and end with .zip
example: awesome-b-blue1.zip
Once the files are extracted/unzipped all the template files begin ab- and end with .pot
example: ab-bright-idea-01.pot
- Click on the filename of the template you want to load with the left mouse button
eg. ab-Bright-Idea-01.pot
Powerpoint 97 / 2000 users need to change the "Files of type" drop-down, from "Presentations and Shows (*.ppt;*.pps)" to "Presentation Templates (*.pot)"
- Then click on "Open"
- First things first...save it under a new name
- Choose the "File" menu (for PowerPoint 97/2000/2002/2003)
- Choose the "Office Button" (for PowerPoint 2007, 2010)
- Select "Save As..."
- Navigate to where you would like to save your presentation e.g My Documents
- Type in a new filename where it says "File name"
eg. February-Sales-Presentation
- Then click OK with the left mouse button
You have successfully loaded a background and saved it under a new name. You are now safe to change the presentation any way you want.
You can edit any of the content of the presentation
To get more pages (eg. more bullet lists) simply
- view the ready made bullet list (normally slide 2 of the ready made pages)
- (for PowerPoint 97/2000/2002/2003): Select the "Insert" menu and select "Duplicate Slide"
- (for PowerPoint 2007, 2010): Select "Home > New Slide > Duplicate Selected Slides"
To alter any of the graphs, simply double click on the actual graph within a page, then simply enter your own numbers
To alter the diagram, simply copy and paste each box around the page, editing the content as you go
To add your logo...
(for PowerPoint 97/2000/2002/2003):
- Choose the "View" menu
- Select "Master"
- Click on "Slide Master"
- You are now on the "master slide"
- Cut and paste your logo on this page
(for PowerPoint 2007, 2010):
- Choose the "View" menu
- Select "Slide Master"
- Click on "1 Slide Master"
- You are now of the master slide!
- Copy and paste your logo on this page
back to top
To make your presentation use a powerpoint background
If you wish to make an existing presentation use an Awesome Background, do the following:
PowerPoint 2007, 2010
- Open your existing presentation
- Choose the "Design" menu
- In the "Themes" ribbon, click the small 'Down Triangle', if you hold the mouse over the 'down triangle' it's marked as 'More...'
- The "All Themes" window will appear
- Powerpoint will show two sections of templates
- This Presentation
- Built in
- To tell powerpoint to look for new templates you need to click the text marked Browse for Themes
- Then it's just a case of telling powerpoint where you have decided to store your new templates
- Navigate to where you have stored your templates
e.g C:\AwesomeBackgrounds\, by clicking the "drop-down",
- Then My Computer, Drive C: Then the folder AwesomeBackgrounds
- Select any of the files, e.g. ab-Bright-Idea-01 and click "Apply"
- PowerPoint will then apply this template to the currently opened presentation.
- Your presentation will now have the style of the new awesome powerpoint background
PowerPoint 2002 / XP / 2003
- Open your existing presentation
- Choose the "Format" menu
- Select the "Slide Design" option
- The Slide Design task pane will appear
- Powerpoint will show three sections of templates
- Used in this Presentation
- Recently Used
- Available for use
- To tell powerpoint to look for new templates you need to click the tiny blue text marked Browse
- Then it's just a case of telling powerpoint where you have decided to store your new templates
- Navigate to where you have stored your templates
e.g C:\AwesomeBackgrounds\, by clicking the "drop-down",
- Then My Computer, Drive C: Then the folder AwesomeBackgrounds
- Select any of the files, e.g. ab-Bright-Idea-01 and click "Apply"
- PowerPoint will apply this template, and also make it available in the "Recently used" list
- Your presentation will now have the style of the new awesome powerpoint background
PowerPoint 97/2000
- Open your existing presentation
- Choose the "Format" menu
- Select the "Apply Design..." option
- Navigate to where the awesome powerpoint background file is located
- Click on the presentation template you require
- Then click on "Apply"
- Your presentation will now have the style of the new awesome powerpoint background
=================================
THAT ENDS THE QUICK START GUIDE
=================================
back to top
Make awesome templates readily available in powerpoint
Making the templates more readily available to browse through is a 3 step process:
1) Find the correct folder where your existing powerpoint templates are currently stored
2) Move your new awesome templates to that folder
3) Create a new presentation with, or apply awesome templates to your presentations
The folder in which standard powerpoint templates are stored, is different depending on your version of powerpoint and how it was installed, and the version of Windows that you are using (e.g. Windows XP/ Vista / etc).
Please follow the instructions below for your version of powerpoint.
PowerPoint 2007, 2010
When you go "Office Button" > "New", powerpoint will list the templates divided sections, "Blank and recent", "Installed templates", "Installed themes", "My Templates", and "New from existing".
These instructions explain how to add an extra AwesomeBackgrounds "tab", tab to the "My templates..." sections.
A) Find the correct folder where your existing powerpoint templates are currently stored
- Start powerpoint, Click the "Office button"
- Click on "Save As.."
- Click on the drop down menu "Save as type"
- Choose "PowerPoint template (*.potx)"
- Click the "down arrow" to show the full path to the correct folder
- The full path to your templates folder is likely to follow this system
- C:\documents and settings\YourUserName\Application Data\Microsoft\Templates\
- C:\users\YourUserName\Application Data\Microsoft\Templates
- Make a new folder called AwesomeBackgrounds by clicking the "new folder" icon (shown above). This is where we are going to move the awesome templates to, in step (B) below.
- Click OK to accept the new folder name
- Click Cancel
- That's it
B) Move your new awesome templates to that folder
- Click "start" on your windows XP/Vista desktop
- Choose "My Computer"
- Double click "Drive C: / Boot C: Local Disk C:"
- You should see a list of folders.
If you've extracted the awesome backgrounds from the downloaded EXE file, to the default folder,
then your awesome backgrounds will be in the folder called "AwesomeBackgrounds"
- So double click the folder called AwesomeBackgrounds
- Select every single file in that folder by going to the "edit" menu > "Select all"
- Edit menu > Cut
- You need to navigate to the new folder we created in Step (A), so close any windows to keep things simple, by clicking the 'X' in the top right of each window
- Again, click "start" on your windows XP / Vista desktop
- Choose "My Computer"
- Double click "Drive C: / Boot C: Local Disk C:"
- You should see a list of folders.
- This time we need to navigate to the same folder we made in Step (A), so if the folder you found in Step (A) was
C:\documents and settings\YourUserName\Application Data\Microsoft\Templates\
- Double click the folder called Documents and Settings,
- Then double click "yourusername", or whatever is your login name e.g. "John"
- Keep double clicking each folder until your reach "Templates"
- If you created a new folder in Step (A), you should see one last folder called Awesome
- Double click the folder called AwesomeBackgrounds
- Edit menu > Paste
- The computer will now move all your new awesome templates to
C:\documents and settings\YourUserName\Application Data\Microsoft\Templates\Awesome
- Close any windows by clicking the red 'X' in the top right of each window
- That's it
C) Create a new presentation with, or apply awesome templates to your presentations
Create a new presentation
- Start powerpoint
- Office Button > New
- Choose "My Templates..."
- As well as the normal "My Templates" tab, you should see a new tab called AwesomeBackgrounds.
- Click the tab called AwesomeBackgrounds and you will see a list of template names
- Choose a template by clicking the filename e.g. ab-Bright-Idea-01.pot
- Powerpoint will show a preview of the template to the right
- Click OK to select that template
- That's it
Apply an awesome template to your presentation
- Start powerpoint
- Open your existing presentation as normal
- Choose the "Design" menu on the ribbon
- In the "Themes" ribbon, click the small 'Down Triangle', if you hold the mouse over the 'down triangle' it's marked as 'More...'
- The "All Themes" window will appear
- Powerpoint will show three sections of templates
- This Presentation
- Built in
- To tell powerpoint to look for new templates you need to click the text marked Browse for Themes
- Double click the folder called AwesomeBackgrounds within
C:\documents and settings\YourUserName\Application Data\Microsoft\Templates\Awesome
C:\users\YourUserName\Application Data\Microsoft\Templates
- Select any of the files, e.g. ab-Bright-Idea-01 and click "Apply"
- Your presentation will now have the style of the new awesome powerpoint background
PowerPoint 2002 / XP / 2003
When you go "File" > "New" > "On My Computer", powerpoint will show all the available templates available in 3 nicely divided sections, "General", "Design templates" and "Presentations".
These instructions explain how to add an additional "tab", just for your "Awesome Templates":
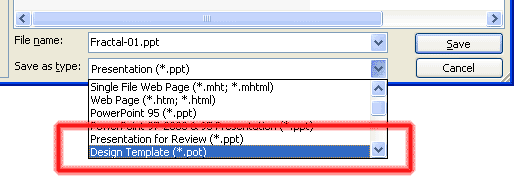
A) Find the correct folder where your existing powerpoint templates are currently stored
- Start powerpoint
- Click on "Save As.."
- Click on the drop down menu "Save as type"
- Choose "Design template (*.pot)"
-
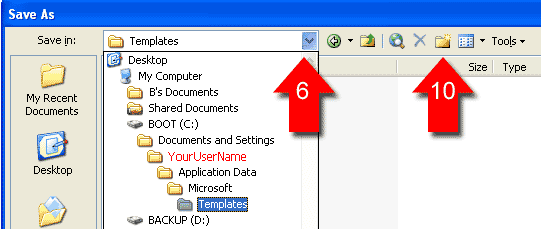
- Click the "down arrow" to show the full path to the correct folder
-
- The full path to your templates folder is likely to follow this system
- C:\documents and settings\YourUserName\Application Data\Microsoft\Templates\
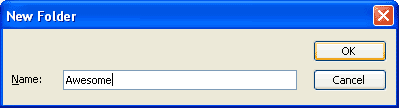
- Make a new folder called Awesome by clicking the "new folder" icon (shown above). This is where we are going to move the awesome templates to, in step (B).
-
- Click OK to accept the new folder name
- Click Cancel
- That's it
B) Move your new awesome templates to that folder
- Click "start" on your windows XP desktop
- Choose "My Computer"
- Double click "Drive C: / Boot C: Local Disk C:"
- You should see a list of folders.
If you've extracted the awesome backgrounds from the downloaded EXE file, to the default folder,
then your awesome backgrounds will be in the folder called "AwesomeBackgrounds"
- So double click the folder called AwesomeBackgrounds
- Select every single file in that folder by going to the "edit" menu > "Select all"
- Edit menu > Cut
- You need to navigate to the new folder we created in Step (A), so close any windows to keep things simple, by clicking the 'X' in the top right of each window
- Again, click "start" on your windows XP desktop
- Choose "My Computer"
- Double click "Drive C: / Boot C: Local Disk C:"
- You should see a list of folders.
- This time we need to navigate to the same folder we made in Step (A), so if the folder you found in Step (A) was
C:\documents and settings\YourUserName\Application Data\Microsoft\Templates\
- Double click the folder called Documents and Settings,
- Then double click "yourusername", or whatever is your login name e.g. "John"
- Keep double clicking each folder until your reach "Templates"
- If you created a new folder in Step (A), you should see one last folder called Awesome
- Double click the folder called Awesome
- Edit menu > Paste
- The computer will now move all your new awesome templates to
C:\documents and settings\YourUserName\Application Data\Microsoft\Templates\Awesome
- Close any windows by clicking the red 'X' in the top right of each window
- That's it
C) Create a new presentation with, or apply awesome templates to your presentations
Create a new presentation
- Start powerpoint
- File menu > New
- Choose "On My Computer"
- As well as the normal "General, Design Templates and Presentations" tabs, you should see a new tab called Awesome.
- Click the tab called Awesome and you will see a list of template names
- Choose a template by clicking the filename e.g. ab-Bright-Idea-01.pot
- Powerpoint will show a preview of the template to the right
- Click OK to select that template
- That's it
Apply an awesome template to your presentation
- Start powerpoint
- Open your existing presentation as normal
- Format menu
- Choose "Slide design"
- The Slide Design task pane will appear
- Powerpoint will show three sections of templates
- Used in this Presentation
- Recently Used
- Available for use
- To tell powerpoint to look for new templates you need to click the tiny blue text marked Browse
- Double click the folder called Awesome within
C:\documents and settings\YourUserName\Application Data\Microsoft\Templates\Awesome
- Select any of the files, e.g. ab-Bright-Idea-01 and click "Apply"
- PowerPoint will apply this template, and also make it available in the "Recently used" list
- Your presentation will now have the style of the new awesome powerpoint background
Top Tip: If you only have a few templates (less than 20), then it makes sense to just put them all in
C:\documents and settings\YourUserName\Application Data\Microsoft\Templates
Then they will always be listed in the "Available for use" section in the "slide design" task pane.
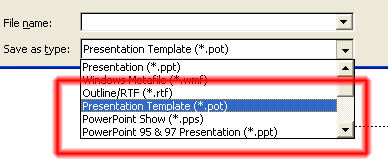
PowerPoint 97 / 2000
When you go "File" > "New", powerpoint will show all the available templates available in 4 nicely divided sections, "General", "Presentation Designs", "Presentations" and "Web Pages".
These instructions explain how to add an additional "tab", just for your "Awesome Templates":
A) Find the correct folder where your existing powerpoint templates are currently stored
- Start powerpoint
- Click on "Save As.."
- Click on the drop down menu "Save as type"
- Choose "Presentation Template (*.pot)"
- Click the "down arrow" to show the full path to the correct folder
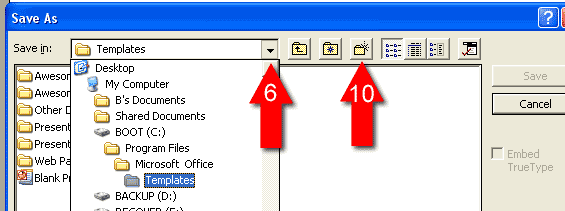
- The full path to your templates folder is likely to follow this system
- C:\Program files\Microsoft Office\Templates
- Make a new folder called Awesome by clicking the "new folder" icon. This is where we are going to move the awesome templates to in step (B).
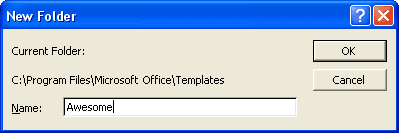
- Click OK to accept the new folder name
- Click Cancel
- That's it
B) Move your new awesome templates to that folder
- Double Click "My Computer" on your windows desktop
- Double click "Drive C: / Boot C: Local Disk C:"
- You should see a list of folders.
If you've extracted the awesome backgrounds from the downloaded EXE file, to the default folder,
then your awesome backgrounds will be in the folder called "AwesomeBackgrounds"
- So double click the folder called AwesomeBackgrounds
- Select every single file in that folder by going to the "edit" menu > "Select all"
- Edit menu > Cut
- You need to navigate to the new folder we created in Step (A), so close any windows to keep things simple, by clicking the 'X' in the top right of each window
- Again, Double Click "My Computer" on your windows desktop
- Double click "Drive C: / Boot C: Local Disk C:"
- You should see a list of folders.
- This time we need to navigate to the same folder we made in Step (A), so if the folder you found in Step (A) was
C:\Program files\Microsoft Office\Templates\Awesome
- Double click the folder called Program Files,
- Then double click "Microsoft Office"
- Double click "Templates"
- Double click the folder called Awesome
- Edit menu > Paste
- The computer will now move all your new awesome templates to
C:\Program files\Microsoft Office\Templates\Awesome
- Close any windows by clicking the red 'X' in the top right of each window
- That's it
C) Create a new presentation with, or apply awesome templates to your presentations
Create a new presentation
- Start powerpoint
- File menu > New
- As well as the normal "General, Presentation Designs, Presentations and Web Pages" tabs, you should see a new tab called Awesome.
- Click the tab called Awesome and you will see a list of template names
- Choose a template by clicking the filename e.g. ab-Bright-Idea-01.pot
- Powerpoint will show a preview of the template to the right
- Click OK to select that template
- That's it
Apply an awesome template to your presentation
- Start powerpoint
- Open your existing presentation as normal
- Format menu
- Choose "Apply design"
- The Apply Design window will appear
- Powerpoint will show the available templates
- Double click the folder called Awesome within
C:\Program files\Microsoft Office\Templates\Awesome
- Select any of the files, e.g. ab-Bright-Idea-01 and click "Apply"
- Your presentation will now have the style of the new awesome powerpoint background
Top Tip: If you only have a few templates (less than 20), then it makes sense to just put them all in
C:\Program files\Microsoft Office\Templates
Then they will always be listed in the "Available for use" section in the "General" tab when you create new presentations.
back to top
To copy just the background graphic image into your presentation
All versions of PowerPoint:
If you just require one of the fantastic background images from any awesome powerpoint background then do the following:
- Open the new awesome background in powerpoint as follows
- Choose the "File" menu (for PowerPoint 97/2000/2002/2003)
- Choose the "Office Button" (for PowerPoint 2007, 2010)
- Click on "Open"
- Navigate to where the powerpoint background is located
Powerpoint 97 / 2000 users need to change the "Files of type" drop-down,
from "Presentations and Shows (*.ppt;*.pps)" to "Presentation Templates (*.pot)"
- Click on the filename of the template you want to load with the left mouse button
- Then click on "Open"
- Choose the "View" menu
- Select "Master" > Click on "Slide Master" (powerpoint 97/2000/2002/2003)
- Select "Slide Master" (powerpoint 2007)
- You are now on the master slide.
- This is where all the clever stuff happens!
- Click on the background image, being careful not to select the title or body text
- When you have successfully selected it, 8 little white markers will appear around it
- Choose the "Edit" menu, Select "Copy". (powerpoint 97/2000/2002/2003)
- Click on the "Home" menu. On clipboard part of the ribbon, click the "copy" button. (powerpoint 2007)
- This will place the background on your computers clipboard
- Open your existing presentation by following steps 2-12
- If your existing presentation has a background image, then please delete it.
- Choose the "Edit" menu, Click on "Paste" (powerpoint 97/2000/2002/2003)
- Click on the "Home" menu. On the clipboard part of the ribbon, click the "paste" button. (powerpoint 2007)
- Nearly there!
- Click on "Draw" located at the bottom left of the screen, Select "Order" and choose "Send to Back" (powerpoint 97/2000/2002/2003)
- On the "Home" menu, in the "Drawing" area of the ribbon, choose "Arrange" and choose "Send to Back" (powerpoint 2007)
- That's It!
back to top
Combine different backgrounds into the same presentation
To get multiple backgrounds in one presentation follow these instructions and repeat the steps for each background you require:
PowerPoint 2007, 2010
These instructions explain how to use 'multiple masters', or more than one template within one presentation.
- Start powerpoint
- Open your existing presentation as normal
- Pick a single slide in the slides task pane (on the left of your screen), to which you want to apply a different style. To select multiple slides in the slide task pane, hold down your CTRL key on your keyboard, or the SHIFT key will select a block of slides.
- Choose the "Design" menu
- In the "Themes" ribbon, click the small 'Down Triangle', if you hold the mouse over the 'down triangle' it's marked as 'More...'
- The "All Themes" window will appear
- Powerpoint will show two sections of templates
- This Presentation
- Built in
- To tell powerpoint to look for new templates you need to click the text marked Browse for Themes
- Then it's just a case of telling powerpoint where you have decided to store your new templates
- Navigate to where you have stored your templates
- e.g. C:\AwesomeBackgrounds\, by clicking the "drop-down",
- Then "My Computer", Drive C: Then the folder AwesomeBackgrounds
- Select any of the files, e.g. ab-bright-idea-01 and click "Apply"
- PowerPoint will then apply this template to the currently opened presentation.
- Your presentation will now have the "style" of the new awesome powerpoint background.
PowerPoint 2002 / XP / 2003
The introduction of Multiple Masters, with powerpoint 2002 (XP), powerpoint finally allowed more than one master / template in a single presentation. These instructions explain how to use multiple masters.
- Start powerpoint
- Open your existing presentation as normal
- Pick a single slide in the slides task pane (on the left of your screen), to which you want to apply a different style. To select multiple slides in the slide task pane, hold down your CTRL key on your keyboard, or the SHIFT key will select a block of slides.
- Format menu
- Choose "Slide design"
- The Slide Design task pane will appear
- Powerpoint will show three sections of templates
- Used in this Presentation
- Recently Used
- Available for use
- If you've followed the instructions above "Make awesome templates readily available in powerpoint", then you will see images of the templates in the "Available for use" section, of the slide design task pane. They are organized dark to light. Continue from step 12 or read the next step to tell powerpoint where your templates are located
- To tell powerpoint to look for new templates you need to click the tiny blue text marked Browse
- Double click the folder called Awesome within
C:\documents and settings\YourUserName\Application Data\Microsoft\Templates\Awesome
- Or navigate to where you keep your templates
- Click the "drop down" menu, next to the template you want to apply, and choose "Apply to Selected Slides"
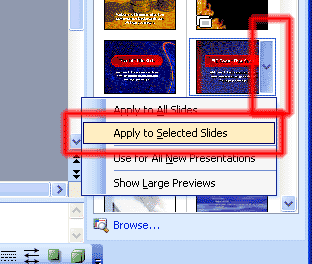
- PowerPoint will apply this template, to just your selected slides, and also make it available in the "Recently used" list
- Your individual slides will now have the style of the new awesome powerpoint background
PowerPoint 97 / 2000
Powerpoint 97 / 2000 cannot apply multiple templates (multiple masters) to one single presentation. These instructions provide a very good workaround.
- While having PowerPoint running do the following
- Choose the "File" menu
- Click on "Open"
- Navigate to where the powerpoint background is located
Powerpoint 97 / 2000 users need to change the "Files of type" drop-down,
from "Presentations and Shows (*.ppt;*.pps)" to "Presentation Templates (*.pot)"
- Click on the filename of the template you want to load with the left mouse button
- Then click on "Open", the awesome PowerPoint background will open
- Choose the "View" menu
- Select "Master"
- Click on "Slide Master"
- This is where all the clever stuff happens!
- Right click on the background image, being careful not to select the title or body text
- When you have successfully selected it, 8 little white squares will appear around it
- Choose "Copy"
- This will place the background on your computers clipboard
- Open your existing presentation by following steps 2-6 or if it is
already open go to step 16
- Go to the slide you want the image on
- Right click the slide you want to insert the image on itself, not a
text box, table, etc, and then choose "Paste"
- Nearly there!
- Once this has been completed right click again on your new inserted
awesome image and go to "Order" and then choose "Send to Back"
- If you will be keeping the image "full screen" size, then it's good practice to tell powerpoint not to display the image from our "slide master". Select the "Format" menu, and choose "background" then tick "omit backgrounds from master".
- Click save.
- That's it
Top Tip: It's best to have the background you will use for the majority of your presentation on the "slide master"
back to top
To darken or lighten the background image in powerpoint
If you would like the background image slightly darker or lighter, then powerpoint has the feature to enables you to darken or lighten the image as well as to increase or reduce the contrast in an image. To do this follow these instructions...
- Open the awesome powerpoint backgrounds as follows
- Choose the "File" menu (for PowerPoint 97/2000/2002/2003)
- Choose the "Office Button" (for PowerPoint 2007, 2010)
- Click on "Open"
- Navigate to where the powerpoint background is located
Powerpoint 97 / 2000 users need to change the "Files of type" drop-down,
from "Presentations and Shows (*.ppt;*.pps)" to "Presentation Templates (*.pot)"
- Click on the filename of the template you want to load with the left mouse button
- Then click on "Open"
- Choose the "View" menu
- Select "Master" > Click on "Slide Master" (powerpoint 97/2000/2002/2003)
- Select "Slide Master" (powerpoint 2007)
- You are now on the master slide.
- This is where all the clever stuff happens!
- PowerPoint 2007, 2010:
- Click on the background image, being careful not to select the title or body text place holders
- When you have successfully selected it, 8 little white markers will appear around it
- Choose the "Format" menu from the ribbon
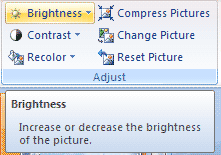
- On the "adjust" area of the ribbon, there are various tools to manipulate the image
- For example the brightness" button, (the one with the sun icon), has options to brighten or darken the image. If you want to change the brightness then choose one of the options e.g. -30%
- Click the "view" menu, then choose "normal" when you are happy with the brightness
- Save the file under a new name by going to the "office button"
- PowerPoint 97/2000/2002/2003:
- Right Click on the background image, being careful not to select the title or body text
- When you have successfully selected it, 8 little white squares will appear around it
- From the menu that pops up, choose "show picture toolbar", if the option "hide picture toolbar" appears, then the toolbar is already displayed somewhere on your screen

- On the picture toolbar, there are various tools to manipulate the image
- Each click of the "less brightness" button (6=the one with the down arrow and the sun icon) will darken the image. So click the button more than once to continue to darken the image
- Click the "view" menu, then choose "slide" when you are happy with the brightness
- Save the file under a new name by going to the "file" menu
- Choose "Save As..."
- Type in your new filename
- Click "Save"
- That's It!
back to top
To remove the "slide number" from every page
If you would like to remove the slide numbering on every page
then do the following:
- Open the new awesome powerpoint backgrounds as follows
- Choose the "File" menu (for PowerPoint 97/2000/2002/2003)
- Choose the "Office Button" (for PowerPoint 2007, 2010)
- Click on "Open"
- Navigate to where the awesome powerpoint background is located
Powerpoint 97 / 2000 users need to change the "Files of type" drop-down,
from "Presentations and Shows (*.ppt;*.pps)" to "Presentation Templates (*.pot)"
- Click on the filename of the template you want to load with the left mouse button
- Then click on "Open"
- Choose the "View" menu
- Select "Master" > Click on "Slide Master" (powerpoint 97/2000/2002/2003)
- Select "Slide Master" (powerpoint 2007)
- You are now on the master slide.
- This is where all the clever stuff happens!
- Click on the background image, being careful not to select the title or body text
- When you have successfully selected it, 8 little white markers will appear around it
- Repeatedly press the "Tab" key (it's next to the Q on the keyboard)
- PowerPoint will cycle through all the objects on the page
- When the "slide #" is selected press the "Delete" key on the keyboard
- That's It!
back to top
To Left align a template
Our templates are always set to "left align", but with a slight difference
to perhaps what you are used to. If you type a few short words for each
bullet, then they will still be set left aligned, but the "block as a
whole" will be centered, instead of starting from the very left of your
slides.
| Left & Centred |
Left Aligned Only |
 |
 |
We feel this gives a much better layout to your slides, as sometimes it can
look a bit odd if the bullets contain only a few short words, then the right
hand side of the slide can look a bit 'empty'. Just like the right hand side box above
If, this is not to your liking, here's how to edit the template to make it
totally left aligned, the text will start from the very left of the slide, and
not be centered as a whole.
- Open your presentation
- Click the View menu
- Select "Master" > Click on "Slide Master" (powerpoint 97/2000/2002/2003)
- Select "Slide Master" (powerpoint 2007)
- Select the text holder for the bullet list, making sure that you are not
editing just the text, but the "whole" text holder. You will know this
because no flashing cursor will be visible
- (For powerpoint 2007, 2010):
- Click the "Format" menu on the ribbon
- On the "shape styles" area of the ribbon, is a tiny little arrow located on the bottom right of that area - Click it
- From the "Format Shape" window choose "Text Box"
- Change the "Vertical Alignment" from "Top Centered" to just "Top"
- Click Close
- On the "slide master" area of the ribbon choose "Close Master View"
- (For powerpoint 97/2000/2002/2003):
- Click the "Format" menu and choose "autoshape" or "placeholder"
(depending on your version of powerpoint)
- On the new window that pops up click the "Text box" tab
- On the area marked "Text anchor point" change it from "Top centered" to just
"Top"
- Click OK
- Click the View menu
- Choose Slide
- Save your presentation
- That's it!
Question not answered here?
See the Frequently Asked Questions (FAQ) page
back to top
|