|
Hints & Tips
Awesome
PowerPoint
Tutorials
Awesome
PowerPoint
Demo Files
Third Party Tutorials
Links
PowerPoint FAQ
Powerpoint Glossary
| |
powerpoint hints, tips and resources

Visit our NEW Powerpoint Demo pages - see the Mad Contraption!!!
Looking for our awesome powerpoint tutorials ?
Looking for our awesome graphics for powerpoint sister website ?
The following tips & hints are for all versions of powerpoint

- The best tip you can have about powerpoint is to use the "Slide Master" page to design the style of your pages BEFORE you start designing your presentation. This is the place to put your company logo, instead of placing it on every single slide put it on the slide master. This is also the place to set up all your fonts, size, and "slide color scheme". This will save you hours of extra work formatting every single slide
- Upgrade to powerpoint 2003. Or at least upgrade to powerpoint 97. If you are still using powerpoint 4 upgrade!. If you are using powerpoint 95 upgrade!. Just the smaller file sizes and faster loading and saving make it worthwhile. Other vast improvements are they ability to animate any object and fine tune build-up slides. Also the ability to add a hyperlink to any object is also very handy
- Upgrade to powerpoint 2007. The built in special effects are worthy of the word awesome
- If you are considering upgrading to powerpoint, we have some great news. Microsoft PowerPoint XP (2002) now has a new viewer to go with it. It's free to download the viewer from the microsoft website. PowerPoint XP has much improved control over the animation of objects, including smooth fades, the ability to have enter and exit animations.
- Keep backups of your work (common sense really!)
Try to think of how long it would take to replace your work...
instead of thinking about how long it would take to do the backup!
- Keep saving versions of your presentation
eg. AwesomePresentation-V01.ppt
eg. AwesomePresentation-V02.ppt
This way if anything horrendous happens (such as the power going off half way through saving the presentation that took you weeks to design, or saving over important files by mistake) you can go back to the previous version. Get the free automatic sequential save add-in
- Use the right quality. If you are including scans in your on-screen presentations, only scan your images at the appropriate resolution. For example - If your presentation will only ever be shown on a PC at SVGA (800x600) resolution. Then why bother scanning anything higher than 800x600 pixels? Also try changing the number of colors in the pictures to 256 colors (indexed color). This saves time, disk space and your presentations will run a lot faster and smoother. You might even be able to email them to people now that they are a lot smaller!.
 (Click Here to a Full and In-Depth PowerPoint Tutorial)
- Learn the quick keys. Creating a lot of powerpoint presentations? Then download this printable quick key and shortcuts reference sheet. (Right Click, Save Target As....) Print it out, attach it to your monitor, impress your boss with your speed improvement using these shortcuts.
- Speed up your slideshows... Turn off "Render 24-bit bitmaps at highest quality" from the "Tools","Options", "Advanced" menu.
Powerpoint 97, 2000, 2002 (aka XP) 2003 and 2007
- Turn off "Fast Saves" This will make your actual .ppt files smaller. This is especially useful when trying the fit them on a floppy disk or to email them
- An extra tip to squeeze your powerpoint file even smaller.... Choose "File", "Properties" and turn off the "save preview image". This also speeds up saving the file, as powerpoint does not have to make up the little image preview
- Consider using a third party utility to automatically reduce the resolution of your scans in your presentation. One such great utility is the excellent The RnR Presentation Optimizer
- To get the best possible black & white hardcopy from powerpoint. From the "view" menu choose "black & white". This will show you what your hardcopy will look like. To alter the way any object will print, simply right click on that object, and then choose the appropriate option. ie. "Black with White Fill". No more saving two versions of a presentation (one for black & white, one for die). Now there is no excuse for those dreadful solid black background hardcopies!

- To copy an object on your page quickly and easily instead of using cut & paste, try this instead. Select the object you want to copy by clicking on it. Hold down the "CTRL" key on the keyboard. Click (with the left mouse button) and drag the object to the new position. Simple & quick. Now try it again but press the "Shift" key at the same time as the CTRL key, this will keep the objects aligned. Great for making diagrams etc.
- Quick Zoom. If you are lucky enough to be the proud owner of a "wheel mouse" (wow!), then the following tips is just for you. While you are editing your lovely presentation (in slide view mode) simply wheel the mouse forward while pressing the CTRL key. Instant zoom! To zoom into a particular object, then select that object beforehand.
- If you type in a lot of presentations containing all those weird characters, you know the ones, the sub-scripts and superscripts, the ± © ® ™ ½ ÷ and all those other symbol that are just not on the average keyboard.....well today is your lucky day....here's what you do in PowerPoint...Tools menu, Customize, Commands, Scroll down the list on the left, Click on "Insert", scroll down the list on the right until you see a lovely Omega symbol (like an upside down horseshoe), Click and drag this symbol into any toolbar you like. Click "Close". Then next time you want a symbol just click it, then if you don't see the character you require just change to one of the other popular symbol fonts, such as:
- Symbol
- Wingdings
- Webdings
- Common Bullets
(one word of warning, if you are giving out your presentation to other people stick to these common fonts as they will be installed on most modern PCs).
- Still on a similar theme to the above tip... why not make your own toolbar, particularly if your a "power" user. It will save you a lot of time, particularly if you use the "Draw" menu a lot. To do this do the following: Tools menu, Customize, Toolbar, New, Enter a name e.g. My ToolBar, Then it's just a case of clicking on the Commands tab, and selecting each button and dragging it to the "My Toolbar". You can also rename certain options, and also change the icons, experiment, have fun!
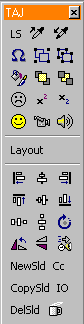
Here's ours . . . . . . . . . . . .
Note: LS=Line Spacing. The Yellow Smiley face, "Camcorder" and "Speaker" icon are for "inserting pictures, movies and sound from file". The "empty smiley" is for setting transparency on a picture. IO=Insert Object, Cc=Change Case, and the Omega symbol is for inserting all those characters that are not on the keyboard!
|
 |
- Get those original bitmaps. OK, you've been sent a presentation with some scans/bitmaps in. Maybe screen grabs of a piece of software or something similar. You want the original bitmaps but you don't have them. All you have is the powerpoint file. You want those bitmaps badly. You want them out of powerpoint and into your image editor. But the crucial thing is you want them in their original resolution. You've tried copying them to the clipboard and pasting them into PhotoShop / PaintShop Pro and you get the bitmaps but it just isn't the same resolution as the original bitmaps. There either too big or too small, you've tried setting the size of the images in powerpoint to display best at 640x480 or whatever, and your getting nowhere fast!. Here's what you do:
- Select the image
- Copy it to the clipboard
- Load up MicroSoft Photo Editor.
Why this method does not work with photoshop and paintshop pro I don't know. I just know Photo Editor works a treat for this.
(You may have to install it from the original powerpoint CD)
- Edit menu, Paste.
- Save the bitmap.
- This method even takes into account any clipping or brightness/contrast effects you have applied in powerpoint, to cancel these effects, first display the "picture toolbar" in powerpoint, then choose the "reset picture" icon. Then follow step 1.
You can then edit the saved bitmap how you like. You can even downsize the image to make your powerpoint files smaller.
- To compare two presentations for any changes...do the following:
(This trick does not work in ppt 2002/XP.)
- Load both presentations into powerpoint
- Make sure you're on normal slideview (edit mode)
- And both presentations are on page one.
- Set the page zoom to "Fit"
- Here's the clever bit . . . Hold down the CTRL key
- Press the "Tab" key - (that's the one next to the "Q" key OK!)
- Press it repeatedly or even hold it on
- Any changes between the two presentations will stand out like a pink piglet flying across the sky.
- Repeat for all pages

- To create an instant agenda or summary slide:
- Open your presentation in powerpoint
- Click the "View" menu
- Select "Slide Sorter"
- PowerPoint will then display a miniature view of all your slides in your presentation.
You may like to choose a smaller viewing size to display all your slides.
This is done by clicking the "edit" menu, select "zoom" or by clicking the "zoom" button
Then enter a really small number, like 25
- Select every slide that you would like to include in the summary slide:
To select multiple slides, press and hold:
- use the "shift" key for powerpoint 97
- use the "Ctrl" key for powerpoint 2000 2002 XP
while you select the slides you would like to include with the left mouse button

- When you have selected all the slides. Click the "Summary Slide" button.
- PowerPoint will then create a summary slide from all the "Titles" of the slides you selected.
It will be placed in front of the first slide that you selected.
- To find out all the slides that have a certain word on them.

- Open your presentation in powerpoint
- Click the "View" menu
- Select "Slide Sorter"
- PowerPoint will then display a miniature view of all your slides in your presentation.
You may like to choose a smaller viewing size to display all your slides.
This is done by clicking the "edit" menu, select "zoom" or by clicking the "zoom" button
Then enter a really small number, like 25
- Click the "Edit" menu
- Select "Find"
- In the new window that pops up, enter the word you would like to find. e.g.. "presentation"
- Then click "Find All", use the "match case" and "find whole words only" as appropriate
- PowerPoint will then highlight, with a black border, around all the slides that have the
word "presentation" on them. So you can see at a glance how many slides have that word on them.
You can also search for multiple words e.g.. "sample presentations".
- To scale text and objects at the same time.
Normally when you select several objects and text (e.g. a diagram), and scale them, powerpoint scales the objects
as you would expect, but it leaves the font size the same. To get around this problem:
- Select all your objects and text
- Click the "Edit" menu, choose "Cut"
- Click the "Edit" menu, choose "Paste Special"
- From the "As:" options choose "Picture", Click "OK"
- Now when you scale this group of objects and text, they will scale exactly as they should.
Be sure to hold the Shift key down, and scale the object using the "corner" handles, to keep everything in proportion
- If you need to edit the actual text, simple choose "ungroup" from the "draw" menu
- To make an AutoShape go smaller than normal.
You've drawn an AutoShape and it will simply not go any smaller by sizing it manually.
e.g.. a circle indicating places on a map
- Select the AutoShape with the mouse
- Right click it and choose "Format AutoShape"
- Then either enter a new "height" and "width" or
- Enter new values in the "scale" boxes
e.g. height 50% and width 50% will half the size of the shape.
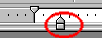
- To finely adjust the space between the bullet point and the text
Sometimes you just cannot get the spacing just right between the bullet point
and the text. And when you adjust it, it's either just too much or too little.
To adjust it finely:
- Turn the ruler on, by selecting the "View" menu
- Make sure there is a tick next to "Ruler" to display the ruler
- Select the text object that you want to adjust
- On the ruler move the lower part of the paragraph indentation. It's called the
"Left Indent". It looks like a small house. But to adjust it finely. . . .
Press and hold the CTRL key while moving the paragraph spacer on the ruler
|
 |
- To remove the white text shadow on text.
If you have the Text shadow option ON for your text, and your background is Black (RGB=0), and your text is any other color, then powerpoint will add a "White" text shadow, which in
most cases looks horrible. If you want to keep the text shadow turned on, but want a black shadow, make your background color either RGB all equal to 16, or just make the blue value = 16. The background will still look black!
Workaround bugs & limitations

- If you get these error messages when you try to drag and drop an AVI video clip. "Video not available, cannot find vids:mjpeg decompressor" or "Cannot display this type of sound or movie" or "MMSYSTEM006 There is no driver installed on your system". Or if you "insert movie from file" and powerpoint simply ignores you. Then try this mjpg mpeg tip that is so simple even we were gobsmacked/astounded.
Rename the file from a .AVI to .MPG - That's it!
(even renaming the file to .QT .MOV .m1v works). We found that you tend to have a greater success rate with AVI files from digital cameras that create movies. We believe this is because most of them use the Motion jpeg codec or mjpeg for short.
Still stuck?.. A logical approach to troubleshooting video in powerpoint.
Software called gspot will tell you what codecs (audio and video) are being used in your video files
- You've pasted an Excel spreadsheet and the right hand side is clipped off....
- Go back to Excel and select the spreadsheet again but this time slightly less
- Re-paste it
- Go back to Excel and select the rest of the spreadsheet continue until you have all the parts pasted into PowerPoint
- Group the parts together in PowerPoint.
- Re-size them as necessary
- Un-group them and position them correctly
- If you open a presentation and start seeing a Big Red X then try some of these options:
- Certainly don't save the presentation.
- Check for a service release of Office Update
- If you have the original bitmap save it as a .BMP file and not a .PNG or .TIF or .JPG, then try re-inserting it
- Try shrinking the offending image until it will display properly...
- Then press and hold the "Alt Gr" key
- Press the "PrtScn" key.
- Choose "Edit", "Paste-special", "picture", "OK"
- If you still see the "Big Red X"....take a break!
|
 |
Download free awesome backgrounds for powerpoint

Make your presentation an awesome presentation.
We hope you liked these hints & tips.
See the new awesome backgrounds for powerpoint
Have you seen our awesome powerpoint tutorials?
|
|