Tutorial about how to add a menu to your powerpoint presentations
This tutorial guides you through how to add an interactive menu in your own PowerPoint® presentations.
It's great for:

- Jumping to a "range" of slides and returning to the menu
- Providing a menu for a live presentation, that presenters can control themselves
- Learning about the "custom show" feature of powerpoint
- Providing a great startup menu screen, so that people can interactively select what presentations to view. It adds a very professional touch for post conference CDs
- Giving your presentations more of a non-linear or multimedia feel
- And generally making your presentations look more professional
- FREE Downloadable files available at the end to see the finished results
- This is OUR original powerpoint menu tutorial - often imitated but never bettered
- Download the printable pdf of this ppt menu tutorial

Theory:
Any object (text, boxes, pictures, graphs etc) in powerpoint can have what's called an "action" applied to it. An "action" is just an instruction for powerpoint to do something when someone clicks on a that object. For example:- Jump to the last slide
- Go back one slide
- Go back to the last slide "viewed"
- stop the presentation
- etc etc.
The tutorial is broken down into two "Methods"
Method One
Using this technique all the individual slides stay in one presentation. You then tell powerpoint that certain slides should be grouped together to form a custom show (or a range of slides), the menu then jumps to named "custom shows", then returns back to the menu
Method one is best for:
- Shorter presentations
- All the slides using the same slide master or template
- The number of slides in each presentation will not change often
Method Two
Using this technique all the individual presentations stay as separate files. You then tell powerpoint to jump (link) to a certain named presentation from your menu
Method two is best for:
- Longer (individual) presentations
- Presentations that do not adhere to one slide master for all the slides, so you can use multiple templates
- When the number of slides in each presentation will change frequently
- Providing a menu for a live presentation, that presenters can control themselves
- Providing a great startup menu screen, so that people can interactively select what presentations to view. It adds a very professional touch for post conference CDs
Both methods make use of powerpoint action settings . . .
Sounds complicated? Then follow this step by step tutorial:
Quick Links:
Creating the interactive menu (for both methods)
Method One
Method Two
Download the Tutorial
Step by Step Tutorial:
|
|
| 1 |
Remember that any object can have an "action" assigned to it. Create your menu with this in mind. |
| 2 |
If you will be using method one, then make your menu slide in the same presentation as all your other slides. It makes sense to have the menu before your custom shows
If you will be using method two then your menu slide will be an individual slide in an individual .ppt file.
|
| 3 |
Here we have a menu slide with 4 options to choose from.
 |
| 4 |
To create the menu slide we used the "Title Only" layout
We entered the title of "Menu"
 |
| 5 |
Then we added 4 separate text objects, asking powerpoint to automatically distribute them vertically using this little known button

See make your own toolbar

That spaces them out nicely |
| 6 |
Next we added 4 buttons to the left of the text. We've used round graphic images, but you can use anything. The easiest thing to use is either text or an "autoshape". These buttons will be assigned an "action" to make them interactive. When we've finished, anyone clicking on the relevant button during a slideshow, will tell powerpoint to jump to a particular section or presentation.

Again we ask powerpoint to automatically distribute them vertically. |
|
|
| 1 |
Assuming you have already created your menu slide, you now need to define the slides that make up each custom show (Think of each custom show as "a section" if it helps you) |
| 2 |
Probably the easiest way to define each custom show (section) is to switch to the slide sorter view of powerpoint by clicking this button  to show the slide miniatures to show the slide miniatures

The slide sorter view will help you locate what slides are in which section |
| 3 |
Click on the "Slide Show" menu, and select "Custom Shows" |
| 4 |
Click on "New..." to create your a custom show (or section)
 |
| 5 |
Change the wording "Custom Show 1" to something more meaningful
We've called ours "History"
|
| 6 |
Next tell powerpoint what slides make up this custom show (or section) called History
You do this by clicking on the slide titles in the left hand list. Click the "Add" button for each slide you want to add to this custom show (or section). It makes life easier if your slides are in sequential order in the first place. |
| 7 |
Click OK when you have finished adding all the slides that make up your first custom show (or section) |
| 8 |
Repeat from step 4 for all the sections you will need to create. In our case we made four custom shows. We named them History, Heart, Pregnancy and Future |
| 9 |
Click "Close" when you have finished creating all your custom shows |
| 10 |
Go to your menu slide that you created earlier. Right click the first button and choose "Action Settings"
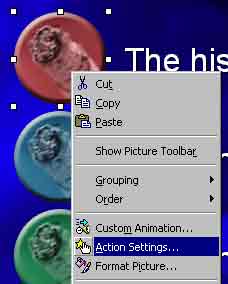
Here you can tell powerpoint what happens when the mouse clicks on an object, or when the mouse moves "over" an object.
|
| 11 |
You can set other options on this menu also, such as...getting powerpoint to "highlight" the button when the option has been clicked, or playing a sound when the object is clicked. Both of these options provide good feedback to the user. It's important to provide feedback so the operator knows a) the button is interactive and b) they've clicked it.
We've chosen to both highlight a click and play a small .wav sound file |
| 12 |
We click "Hyperlink to:" and choose "Custom Show..."
|
| 13 |
Power Point should list all your custom shows that you created earlier. Click the section name that you want to associate with this button. In our case it's "history".
 |
| 14 |
Very important step....tick the "Show and return" option. This tells powerpoint to show this custom show, then when it's finished return from where it came. In our case it jumps back to our menu.
 |
| 15 |
Repeat from step 10 for all your buttons. |
| 16 |
A nice feature for the presentation would be to add a button on each slide that allows you to jump back to the main menu at any time. This is easily done by adding a button on each slide, right clicking it, then choosing "action settings"
 |
| 17 |
This time we tell powerpoint to "Hyperlink to:" a particular "Slide..."
 |
| 18 |
Select your MENU slide and click OK
 |
| 19 |
Our final touch is to add a "quit" or "exit" button on our main menu slide.

Clicking this quit button on our main menu slide will stop the presentation |
| 20 |
We give this the action of "End Show", by right clicking the quit button and choosing "action settings"
 |
| 21 |
Save your presentation and test it. Each button should jump to a different custom show and then return to the menu slide, when that presentation finishes, you click the "menu" button, or you press the "Esc" key. |
| 22 |
Job Done! |
|
|
| 1 |
Put all your separate presentations, that you will be linking to, all in the same folder (directory)
e.g. C:\mywork\presentations\
This is best done with Windows Explorer. The reason to put all the .ppt files in the same folder is to save complications later, particularly if you transfer this presentation to a CD or another PC. |
| 2 |
Go to your menu slide that you created earlier. Right click the first button and choose "Action Settings"
Here you can tell powerpoint what happens when the mouse clicks on an object, or when the mouse moves "over" an object.
|
| 3 |
You can set other options on this menu also, such as...getting powerpoint to "highlight" the button when the option has been clicked, or playing a sound when the object is clicked. Both of these options provide good feedback to the user. It's important to provide feedback so the operator knows a) the button is interactive and b) they've clicked it.
We've chosen to both highlight a click and play a small .wav sound file |
| 4 |
We click "Hyperlink to:" and choose "Other PowerPoint Presentation..."
|
| 5 |
Navigate to where your presentation is, that you want to jump to, with this button
Click the filename, then click OK. In our case we want to link to the "history.ppt" presentation. Click OK |
| 6 |
After you click OK, a new menu will pop up, asking you what individual slide do you want to jump to when you jump to your linked presentation
To keep things simple, it's better to always jump to the first slide. In our case "The history of smoking" |
| 7 |
Repeat from step 2 for all your buttons. |
| 8 |
During a slideshow, if you click any of our interactive buttons, powerpoint will display whatever presentation we have told it to, over the top of our main menu. Our menu is always there in the background. It does this seamlessly. The audience never get to see you loading another presentation by hand. Very professional. |
| 9 |
A nice feature for the presentation would be to add a button on each slide that allows you to jump back to the menu at any time. This is easily done by adding a button on each slide (in the linked presentations). Right click the button, then choose "action settings"
|
| 10 |
This time we tell powerpoint to "Hyperlink to:" - "End Show"
So what is really happening here is that you click a button on your menu. Power Point jumps to another presentation. If you click the "menu" button, then powerpoint will "End Show", or in other words "Quit back to where it came from". In our case it will return to the menu. |
| 11 |
Our final touch is to add a "quit" or "exit" button on our main menu slide.
|
| 12 |
We give this the action of "End Show", by right clicking the quit button and choosing "action settings"
Clicking this quit button on our main menu slide will stop the presentation |
| 13 |
Save your presentation and test it. Each button should jump to a different presentation (powerpoint file) and then return to the menu slide, when that presentation finishes, you click the "menu" button, or you press the "Esc" key. |
| 14 |
Job Done! |
Download free awesome backgrounds for powerpoint

|
Experiment with different "hyperlink to" settings. You can mix and match jumping to custom shows and other powerpoint presentations. You can even hyperlink to other programs by using the "Other file" option. Or you can hyperlink to webpages on the internet by using the "hyperlink to" "URL".
A word of warning.....try not to interlink presentations to each other, as not only will powerpoint get confused, but you will also. You could end up with more than 2 presentations, in slideshow mode, both running at the same time....This is not good!
The following assumptions were made for this tutorial:
- You are using powerpoint 97 or 2000. For powerpoint XP the principle is the same except some of the menus will look slightly different
- You have a basic knowledge of powerpoint
- All your presentations should have the page size set to "on-screen"
To download the files used in this tutorial right click the image below, then choose "Save target as" (IE), or "Save Link As" (Netscape).

- The file downloaded is a Zipped file which will need unzipping.
- It contains a both (method one and two) examples of this tutorial. Filesize 1.2mb
Have Fun!
Please Note: Although we have made every effort to check the files against viruses at all stages of production. It is always wise to run a virus checker on any software before running it. By Default! cannot accept responsibility for any loss, disruption or damage to your data or computer system which may occur while using either either the CD-Rom or downloaded files. It is assumed that by downloading the files you accept these conditions. Otherwise do not use the awesome backgrounds for powerpoint.
See the new awesome backgrounds for powerpoint
|