| 1 |
For this tutorial we will create a directory / folder on our
computer called C:\Tutorials\Looping 
|
| 2 |
Put all your presentations, for this project, in this directory. For this
tutorial we will just have two presentations that we will link to, (Looping.ppt is the
presentation that will loop, and linked01.ppt is the actual presentation) and our show
presentation.

|
| 3 |
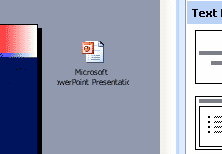
Using powerpoint, save one of your presentations as "Show01.ppt".
This is the presentation that will call up all the other presentations.
|
| 4 |
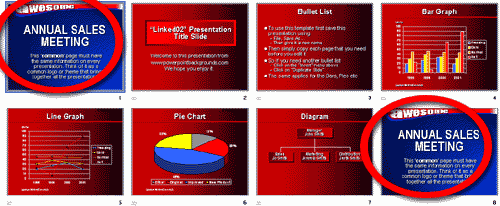
Make a common screen as the first slide in this presentation.
You can delete any other slides, at this point, in this Show01.ppt presentation.
It's important that any background images are actually on this page and not on the "slide master".

It's also important that this slide is using the layout called "blank", as this
stops powerpoint from re-formatting your common slide when you paste it into other presentations.
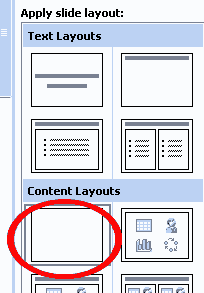
To apply the blank layout do this
Format menu > Slide Layout > Content Layouts > Blank > Apply to select slides
|
| 5 |
Now for the clever stuff!
Choose the Insert Menu,
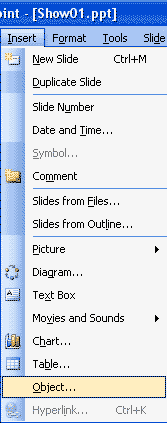
Click on Object and the following will appear
|
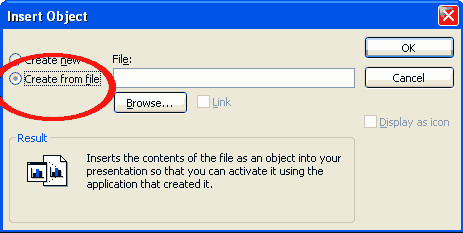
| 6 |
Click on Create from file and the following will appear
|
| 7 |
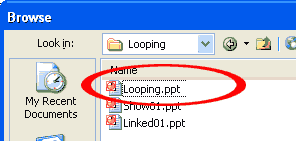
Click on the "Browse" button and
navigate to your first presentation that you want displayed when you run the show.
|
| 8 |
Click on your first presentation (in this case Looping.ppt) and click OK.
|
| 9 |
Click on "Link" and you should see the following
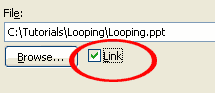
Note: The option to "link" is not available on the mac version of powerpoint. However, it is still possible to chain presentations together.
|
| 10 |
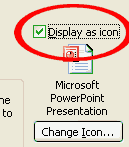
Click on "Display as icon" and
then click the "OK" button
|
| 11 |
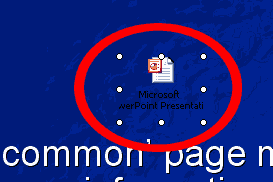
The following powerpoint icon will appear in the middle of your current slide
|
| 12 |
Click and drag the icon off to the edge of your slide area. You may have to zoom out (view menu > zoom) to see the blank area off the current page.
|
| 13 |
Add a note to yourself (or anyone else know may use this presentation), just use a regular textbox. Again position it off
the edge of the screen, just above the powerpoint icon. For example:
 |
| 14 |
You've successfully linked a presentation into your show presentation.
Now to tell powerpoint to display the linked presentation automatically.
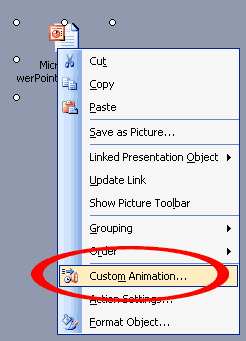
Right click the informative textbox and select "Custom Animation"
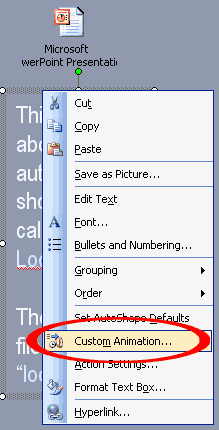
The powerpoint custom animation task pane will appear
|
| 15 |
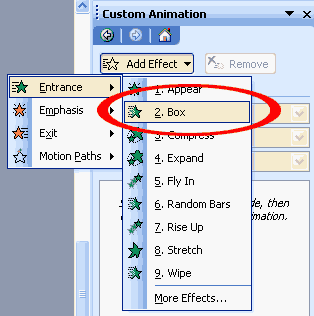
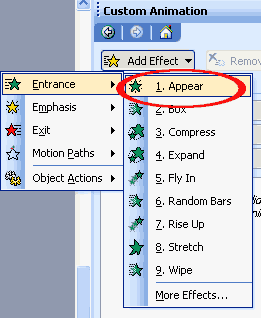
Click on the "Add Effect" button, make the
"Entrance" effect set to "Box".
|
| 16 |
Click on the "Start" drop down, change the "On Click" to "With Previous".
 |
| 17 |
Right click the ppt icon, we added earlier, and select "Custom Animation"
|
| 18 |
Click on the "Add Effect" button, make the
"Entrance" effect set to "Appear".
|
| 19 |
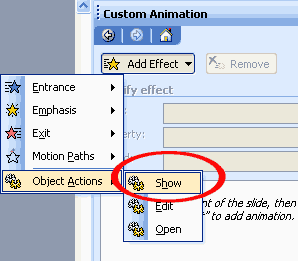
Click on the "Add Effect" button again, change the
"Object actions" to "Show". This tells powerpoint to show the presentation
|
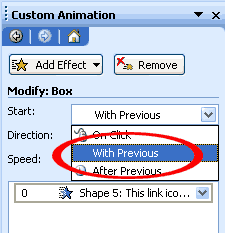
| 20 |
You should have 3 entries in the custom animation timeline. Select the 2nd entry (the green star - object 6 in our case) then click on the "Start" drop down, change the "On Click" to "After Previous".
 |
| 21 |
Select the 3rd entry (the two gears - object 6) then click on the "Start" drop down, change the "On Click" to "With Previous".
This tells powerpoint to automatically open and show your linked presentation without any user intervention.
 |
| 22 |
To link in the rest of your presentations. Copy this slide by
choosing the "Insert" menu, and select "Duplicate Slide". Delete the
powerpoint icon at the edge of the screen. Then Repeat steps 5-21 |
| 23 |
For each linked powerpoint presentation you must add the "common"
slide as the first and last slide. So powerpoint will display the same slide when it jumps
from each linked presentation and back to the "show01.ppt" presentation.
|
| 24 |
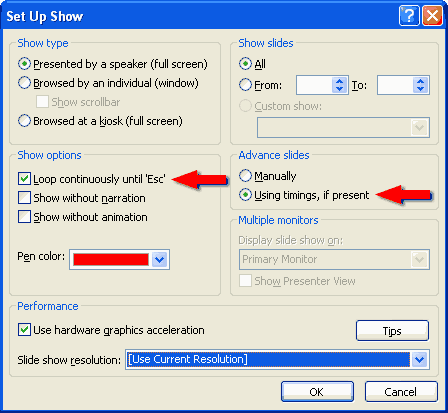
To make your "looping" presentation actually loop: Choose
the "Slide Show" menu, click on "Set Up Show", make sure "Loop continuously until Esc" is ticked in the "show options" section.
Under "Advance Slides" tick "Use timings if present"
|
| 25 |
To tell powerpoint how long to display each of the looping slides: Choose
the "Slide Show" menu, click on "Slide Transition", Under the
"Advance slide" settings, Tick "automatically after 00:05 seconds":
Typically about
5 seconds is long enough to display a logo.
10 seconds for a couple of lines of text.
15 seconds for a page full of text.
Make sure the "On mouse click" is ticked also. This will give you to option
of advancing the slides using the keyboard or mouse if you so require.

Click "Apply to all slides" to make each of the looping slides dispay for 5 seconds.
|
| 26 |
Save It That's it!
Linking Tips
To display the actual show, all you need to do is load the file called
"show01.ppt" and display it. Please note when you load the presentation
powerpoint will display "this presentation contains links to other files - Do you want to update
them"...Always choose "Update Links" to this question. Powerpoint will do the rest.
To stop the looping presentation just press "Esc" on the
keyboard once and powerpoint will exit from the looping presentation back into show01.ppt.
press the right cursor key/left mouse button to continue the presentation as you normally
would and your into your next presentation.
Just use the mouse button or the right cursor key to move forward through the
presentation. Remember that to move from a linked presentation to the next presentation
you will have to click 3 times for powerpoint to display the next presentation.
The first click will move back to the "show01.ppt" presentation
The second click will move to the next slide in "show01.ppt", powerpoint will
then automatically load the next presentation. So you may want to wait half a second
before pressing for the 3rd click.
The third click will move from the "common" slide in the linked presentation to
the first real slide.
If your "common" slide has animations, that's OK, but the 1st slide in any linked presentations should be a 'static' version.
If you have any housekeeping slides, it makes sense to put them in the show presentation.
If the running order of the speakers gets changed at the very last minute, all your need to do, is move the linking slides in the Show presentation using the slide sorter, which takes all of 2 seconds.
If a particular presenter cuts short their presentation, pressing the Home or Esc key will make powerpoint go to the last slide in their
presentation, which if you've followed the tutorial, will be the Common slide. So you can seamless quickly finish a presentation and the
audience will never know the presenter forgot their last few slides
One last tip.... never set a link from a linked presentation back to the linking presentation,
instead set the action to "End show". Otherwise you will have more than 2 presentations open at the same time, and that's very bad!
|
Download free awesome backgrounds for powerpoint

|